Configuring IP Phones (Provisioning)
It is recommended to introduce the phones to the 3CX IP Switchboard System using the Porvisioning method. The Provisioning method allows you to make the settings of ip phones in bulk by creating a certain template to be most compatible with 3CX IP PBX. Thanks to the Provisioning method, it allows you to change the phone's settings from the 3cx management console without entering the phone's interface. It eliminates the risk of assigning missing or incorrect values due to manual configurations.
There are different methods depending on the location of your IP Phones and 3CX Server.
- Plug and Play (PnP): It is the method you can use with your 3CX Server and IP Phones on the same network and within the same subnet mask or with your phones running behind the 3CX SBC software.
- RPS Server (SIP/STUN):It is the method you can use when your IP Phones are located in different external networks with your 3CX Server.
- DHCP (Option 66 ): It is the method you can use when your IP Phones and 3CX Server are in the same center but in different IP blocks.
Plug and Play (PnP) Provisioning
It is the simplest method you can use to identify your phones to the system. To use this method, the phone must be on the same network as the PBX or deployed behind an SBC. Read this guide to connect a phone to a remote network via SBC. To automatically prepare phones using Plug and Play:
- Connect the phone to the network. It will send a multicast message to be received by 3CX.
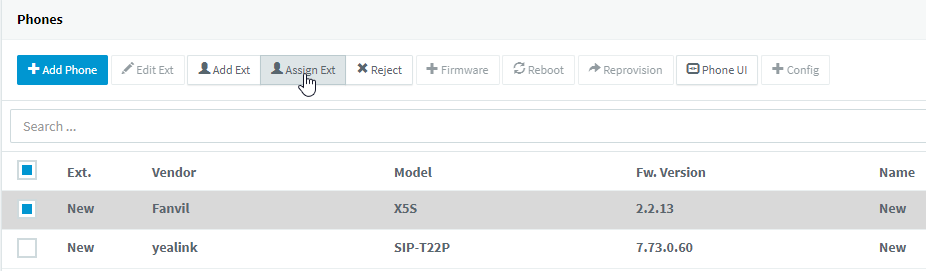
- The phone will appear in the "Phones" menu in the 3CX Management Console. Select the phone that says "New" and assign it to an extension with "Assing Ext" or create a new one using the "Add Ext" button.
- Leave the "Mac Address" fields in the subscriber's opened "Phone Provisioning" tab at the default values. You can configure other phone settings under "Option" on the same page, eg. "Phone Display Language" and "Date Format".
- After your settings are finished, save your settings with the "OK" button at the top of the page. The saved settings will be sent to the phone by the PBX, your phone will automatically reboot and be ready to use. Some phones don't need to reboot.
RPS Server (SIP/STUN) Provisioning:
This method is for remote phones that are not in a LAN or behind an SBC. It uses 3CX RPS server and provision phones using Direct SIP & STUN.
Requirements !!!
-
Upgrade the phone to the last Firmware that 3CX has released.
-
The extension to which the phone will be assigned must be defined in the 3CX System.
- Enter the features page in the Extension menu of the subscriber and remove the check mark at the beginning of the "Disallow use of extension outside the LAN (Remote extensions using Direct SIP or STUN will be blocked)" option under the "Restrictions" heading in the "Option" tab.
- SIP 5060 UDP, RTP 9000 - 10999 UDP and HTTPS 5001 TCP ports on the Firewall/Modem device where the 3CX IP PBX Server exits to the internet must be NATed to the 3CX Server.
- Go to the "Phone" menu on the 3CX Management screen and select the relevant subscriber from the Subscriber list by pressing the "+Add Phone" button.
- Select the Make and Model of the phone from the list, enter the MAC address in the format XXXXXXXXXXXX without " : " or " -" and save it with the "OK" button.
- You will be automatically redirected to the "Phone Provisioning" tab of the corresponding subscriber. Select the "Direct SIP (STUN-remote)" parameter from the "Provisioning Method" list under the "IP Phone" heading on this page.
- You can configure other phone settings under "Option", eg. "Phone Display Language" and "Date Format".
- After your settings are finished, save your settings with the "OK" button at the top of the page.
- Make sure that the phone is connected to the network in a remote location and has an internet connection.
- Send an e-mail by ticking the box at the beginning of the relevant subscriber from the "Users" menu and pressing the "Send Welcome Email" button.
- Before the phone connects to the RPS server from the internet and pulls the necessary configuration file, it will ask for a user name and password on the screen. Confirm by typing your Extension Voicemail PIN number into the Username field on the Extension Number phone screen in the e-mail you sent in step 7, and also by typing your Extension Voicemail PIN into the password field on the Phone screen.
- After pulling the necessary configuration file, the phone will reboot and be ready to use.
Note:
DHCP (Option 66 ) Provisioning:
3CX Sunucunuz ile telefonlarınız farklı Vlan ile ayrılmış durumda veya Cisco, Cisco SPA, Polycom, Aastra.. gibi dessteği kaldırılmış ürünler kullanıyorsanız Dhcp Option 66 yöntemini kullanabilirsiniz.
- Update the phone to the last Firmware.
- Confirm the phone by selecting the brand and model by pressing the "+Add" button in the "Phone Provisioning" tab in the "Extesions" menu, on the features page of the relevant subscriber, and by typing the MAC address in XXXXXXXXXXXX format.
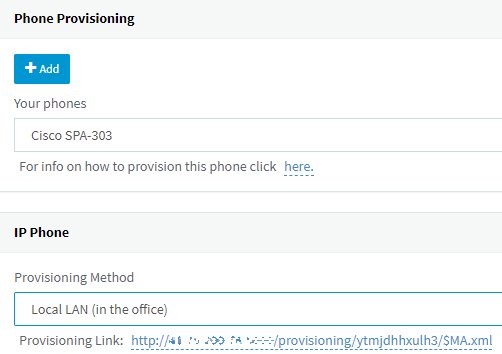
- Copy the Provisioning Link and find the relevant Scope settings of your DHCP server. Activate the Option 66 feature and add the line you copied and save it.
Note: Restart the DHCP server's service to enable Option 66 feature.
- Factory reset your phone.
- After your phone receives the ip address at startup, it will learn from where to pull the configuration file thanks to option 66, and after pulling the file, it will close and open again and complete the configuration process.
FAQ
S: We work with more than one brand and model product in our company, and each brand's Provisioning Link address is different. Option 66, can we enter more than one Provisioning Link address?
C: You cannot enter more than one address in Option 66, you can only continue with the address of one brand and continue with the manual configuration option for other brands. You can use the addresses below for manual configuration.