Dashboard
The 3CX Dashboard screen gives us an overview of the status of our exchange.
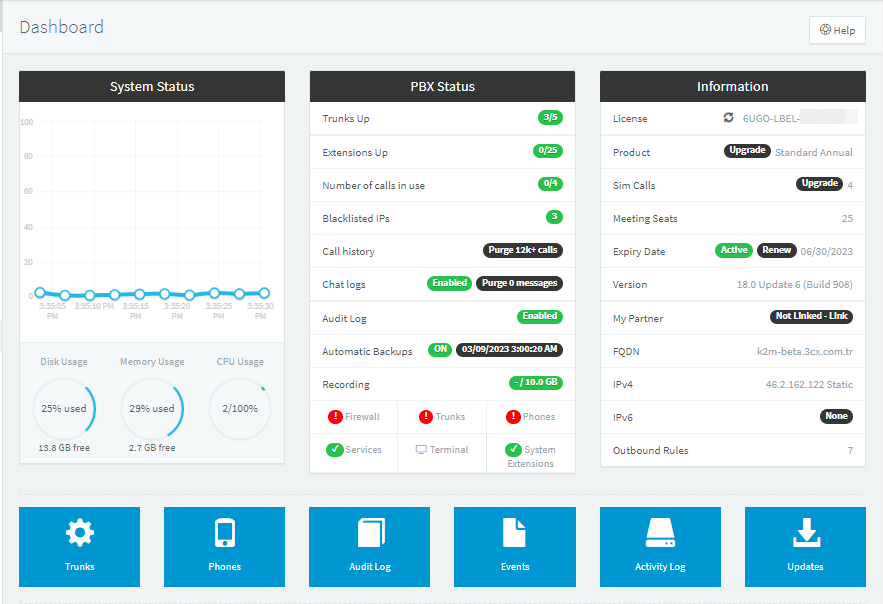
Dashboard screen consists of 3 parts:
- System Satatus: It gives instant information about Disk, RAM, CPU usage of our server.
- PBX Status:
- Trunks UP: It gives the number of external lines defined in your system and the number of active ones. (Active Trunks / Total Trunks) You can switch to Trunks page by clicking on it.
- Extensions Up: Gives the number of Active Users/Total Users defined in your system. You can switch to the Users page by clicking on it.
- Number of calls in use: It gives the channel number of your system. (Channel used / Total channel) By clicking on it, you can go to the Active calls page and access the details of the calls.

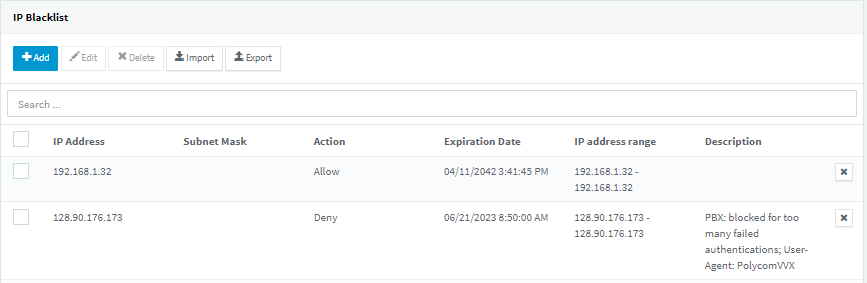
- Blacklisted IPs: It gives the total number of banned IP addresses as a result of sending wrong username and password information to your system. By clicking on it, you will be directed to the IP Blacklist page where you can manage the banned or allowed IP addresses.
- Call History: When clicked, it redirects to the Call Log page under Reporting. The Purge Calls button to its right allows you to clear the call history. You can delete all calls, before the last 1 month, before the last 1 year or call records within the desired date range. The return of this process can only be prevented by taking a regular Backup. However, if the backup was taken the previous day, you cannot restore the current day's call history.
- Chat Logs: If you are using 3CX's LiveChat feature, you can keep its messaging history. You can go to the messaging history by clicking on this field, turn on/off the keeping messaging history feature with the Enable/Disable button, or delete the messaging history by pressing the Purge Messages button.
- Audit Log: You can go to Audit Log history by clicking this field. With the Enable/Disable button, you can turn the Audit Log history feature on or off. Audit Log provides details of when the person logging into the Management Console logs in, the internal number of this person and the registered name and surname, IP address, in which field he has acted, what effected the transaction, what actions were taken on the affected person and, if any, details of this transaction. gives the information. This page is often helpful in finding out which IP address the attack was made from in attack situations. If you log in from the computer on which the system is installed, the IP address will appear as 127.0.0.1.
- Automatic Backups: ON/OFF You can view whether your system is automatically backed up. By clicking on it, you will be directed to the Automatic Backup configuration page.
- Recordings: It shows the disk size determined for the audio recordings to be kept in the system as Used / Allocated.
- Firewall: Firewall checker is a module where you can test whether the ports used by the 3CX system are properly NATed. By pressing the Firewall button, you will be directed to the Firewall Checker page. You can start the test by pressing the Run button here. Firewall checker tests only UDP ports (5060, 5090, 9000-10999) if SIP ALG feature is active on your firewall device. If any of these ports fail the test, firewall checker will fail. If all is successful, the Firewall button on your dashboard will turn green.
Note: When Firewall checker is run, the SIP Server Service will be stopped, so the system will not be able to provide conversation service. It is recommended that you do this test at a time when users will not be affected.

- Trunks: It checks whether the Tunks or Gateway devices defined in your system are on the 3CX supported page. An error is not a situation that will affect the operation of your system. Working with an operator / Gataway device that is not in the list means that you will not be able to receive service from the 3CX support team in case of a problem.
- Phones: It checks the firmware versions and configuration templates (Template) of the IP phone devices defined in your system. It will appear green if it is current, and red if it is not.
- Services: 3CX checks for background services installed in the operating system. If services are running, it will appear green, if one or more of them are stopped, red. By clicking on it, you can go to the Services page where you can manage the services and perform the necessary checks.
- System Extensions: The system has predefined conference, hold, voice mail, fax etc. It checks that the service is not working properly. If one of these services has stopped, it will appear in red. By clicking on it, you can go to the System Extensions page and perform the necessary checks.
3. Information:
- License: In this area, you can view the license key used in your system. If you wish, you can copy your license key with the copy button that comes up with the mouse.
- Product: Indicates the type of product you are using.
- Sim Calls: Shows the number of sim calls your license supports.
- Meeting Seats:
- Expiry Date: Returns the expiration date of your license key.
- Version: Shows the version you are using on your 3CX system.
- My Partner: Shows the name of the dealer from which you purchased the license key.
- FQDN: It shows your FQDN address that 3CX has made available for you, which you have specified in the installation.
- IPv4: Shows your external IP address that your system is using. Depending on whether your IP address is static or dynamic, it indicates next to it.
- IPv6: If you are using IPv6, it shows your address.
- Outbound Rules: It shows how many Outbound Rules are defined in your system.
FAQ
S: 5?
C: 5